Posts Tagged ‘Harry Poulter’
Making Cheese at Home
Blessed are the Cheesemakers
Life of Brian
Harry Poulter’s domain ranges beyond the garden and into the kitchen. He recently applied his skills at grain fermentation to another homemade specialty – Cheese making. Think of his story as “Rake and Palate…”

Harry D. Poulter, Cheesemaker, Buckingham, VA USA
If you can cook, you can start making cheese at home. If you have ever brewed beer, you are halfway there. The simplest cheeses (fresh, spreadable) can be made in a day, with ingredients as common as milk and lemon juice. The most complex cheeses may require heavy presses and months or years of aging.
In addition to what you might think of as cheese, you can easily make cultured butter, yogurt, kefir, paneer, crème fraiche, mascarpone, cream cheese and many more cultured dairy products. I guarantee the fresh homemade varieties will delight you. Guests enjoy knowing you made the cheese you are serving. And savoring your own home-baked bread with your own homemade cheese or butter is an irreplaceable treat for the senses.
I got started when an old friend told me his precocious 11-year old stepdaughter was making cheese. That was a challenge I couldn’t ignore. I thought “Why am I not making my own cheese?” I had been making my own yogurt for years. A short time later, I had acquired the tools and knowledge and had the process down for making some basic and semi-advanced cheeses.
Interested? I’ll show you how to get started.
Cheese, Glorious Cheese
If you can cook, you can make cheese.
The origins of cheese making are lost in the mists of time, but the process was well established by the time of the ancient Romans and was described by writers of the period. Cheese making probably developed by a series of serendipitous discoveries, which led to a process by which the protein and fat of milk could be separated, solidified and preserved. Rennet and milk-digesting bacteria help acidify the cheese, and, with the addition of salt and other beneficial microbes and molds, inhibit the development of harmful or decay-producing microbes. The breakdown of proteins also leads to the development of wonderful flavors. Local milk varieties, native micro-flora and –fauna and special conditions (like caves) led to regional specialties. The ancient Romans especially esteemed cheeses from what is now France (for much more, see “On Food and Cooking – The Science and Lore of The Kitchen” by Harold McGee).
Information on Cheese Making
Get some good books on the subject. I find it is best, especially for the more complex cheeses, to compare several recipes and see what they have in common and how they differ. I keep a record (my “cheese log”) of each batch to record any notable successes or attempts that could be improved. The book I use most frequently is “Artisan Cheese Making at Home” by Mary Karlin. It’s a good reference and cookbook, though there are some math errors in some recipes (again, compare several sources). Second favorite is “200 Easy Homemade Cheese Recipes” by Debra Amrein-Boyes. I also use Ricki Carroll’s “Home Cheese Making”. There are also numerous online sources, YouTube videos, etc. The most useful online site is probably www.cheeseforum.org . Cheese making suppliers’ websites (see Supplies) also have recipes and tips.
Equipment and Supplies
If you are a cook, you probably have the equipment you need to make the simplest cheeses. For the more ambitious cheeses, you will need a few specialized items – molds for forming cheeses, a special ladle and curd knife, butter muslin (a fine-weave version of cheesecloth), draining containers, etc. My biggest investment so far has been a “cheese cave” which provides a controlled environment at about 50 degrees Fahrenheit. I use a “dorm-style” refrigerator, with no freezer compartment, that is plugged into a thermostatically switched outlet. The switch has a long wire probe that is run into the refrigerator to monitor the temperature. Amazon sells a good switch for about $50 (Johnson Controls A19AAT-2C). The best sources I have found for equipment, supplies and specialized ingredients are www.thecheesemaker.com and www.cheesemaking.com
Ingredients
First – the freshest dairy products you can find. A local dairy is your best choice. Try a farmer’s market, or Whole Foods. We have a smallish dairy in nearby Roanoke, VA that sells good quality milk and cream, including non-homogenized (cream on top) milk, which makes a superior cheese. For recipes requiring cream or half-and-half, look for brands which have no additives and are not ultra-pasteurized.
Mold cultures/bacteria cultures/rennets – These specialty ingredients require an initial investment, but they keep a long time. Store cultures in the freezer, rennet in the ‘fridge. Animal rennet is made from the stomach of calves, so some people avoid it. I find that vegetarian rennet is suitable for all but some long-aged cheeses. Commercial cheese manufacturers have started to use rennet produced by modified bacteria, but as far as I know this is not yet available to the home cheese maker.
Let’s make cheese!
1. Dead simple cheese (lemon cheese)
Ingredients
¼ – ½ cup fresh lemon juice (2 or three lemons)
½ tsp. salt – kosher salt works well
Optional herbs and/or garlic
Procedure
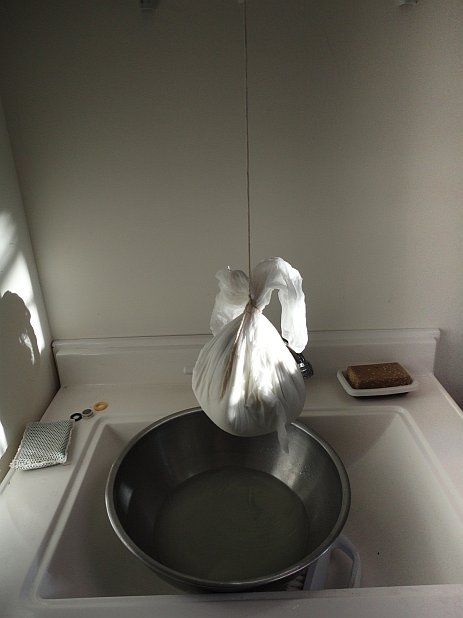
Hanging the curds to drain.
Heat the milk slowly, stirring frequently, to about 175 degrees F. Remove from heat and stir in ¼ cup lemon juice. Wait 15 minutes and see if you have a distinct separation of curds and clear whey. If the whey is still cloudy, stir in another tbsp. of lemon juice and wait another 15 minutes. Repeat until you have a clear separation.
Line a colander with several layers of cheesecloth (or use butter muslin if you have it). Dampen the cloth and dump the contents of the pot into it. Set the colander over a bowl if you want to save the whey (for bread making). You can either leave it to drain as is, or gather up the cloth into a bag and hang it. After an hour or two, it should have a good firm texture.
Put the curds in a bowl and stir in the salt. You can also add a mixture of herbs (Herbes de Provence is good), chives, garlic, etc. to taste. Refrigerate to firm up the cheese and blend the flavors. This cheese will keep well for about a week.
2. Camembert – A good beginner’s “real” cheese.
I won’t give every detail of the recipe here, since it is widely available, and you should have at least one good cookbook before you get this far, but I will illustrate the process.
Sanitation
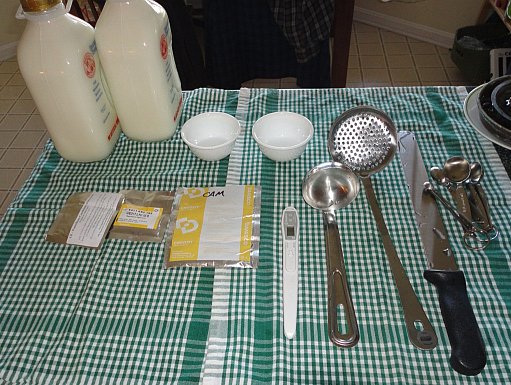
Thermometer, ladles, curd knife, measuring spoons, etc. All sterilized and laid out on a clean cloth. The foil packs hold the bacterial and mold cultures.
Since this cheese needs to age for a while, we need to be more careful about sanitation than with our quickie lemon cheese. We don’t want bad bugs or molds to get a foothold. The first step is to sterilize all cooking vessels and equipment that will contact the milk and cheese. A weak bleach solution (1 tsp/gallon of water) is sufficient. Brewer’s B-Brite or similar oxidizing cleaners will also work.
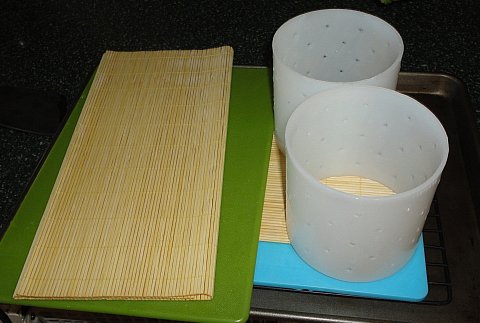
More equipment – sushi mats, PVC “hoops”
The perforated PVC sections are open-bottomed molds, or “hoops”, for forming the Camembert. The bamboo mats are sushi mats. Also a rimmed baking sheet and two plastic cutting boards. All have been sterilized.
Procedure

Preparing the bath at 85 degrees F.
Heat the milk, slowly, in a heavy-bottomed (sterilized) pot to 85 degrees F. Then sprinkle on the starter culture (bacteria), and the cheese molds which will form the white rind of the Camembert. After letting the cultures hydrate on the surface for a few minutes, stir them in and hold the temperature for 90 minutes. Most cookbooks advise you to use some kind of double boiler or stove-top water bath to maintain heat. I just fill the kitchen sink with water at the target temperature.
After the curds have achieved a “clean break” from the whey, we slice the curds into chunks. They will not be neat cubes, but a cottage cheese-y mess. The whey should be clear, though.
After cutting, the curds are stirred, then allowed to rest to consolidate and further separate from the whey.
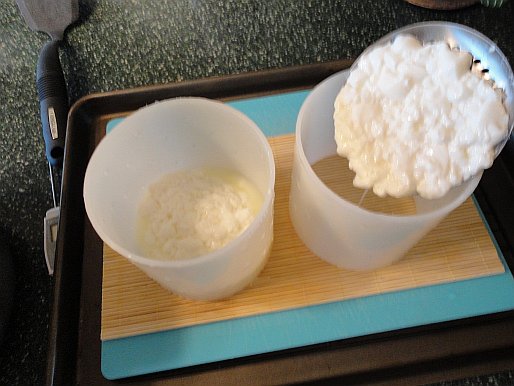
Ladling the curds into the molds to drain and consolidate.
Once the curds are consolidated, we spoon them into the two hoops, which are set upon a sushi mat, which is on a cutting board inside the baking pan.
Then, another sushi mat and cutting board are placed on top. Periodically, we need to pick up the whole assembly and flip it so the alternate cutting board is on the bottom. This is a little tricky. We may also need to drain the bottom pan.
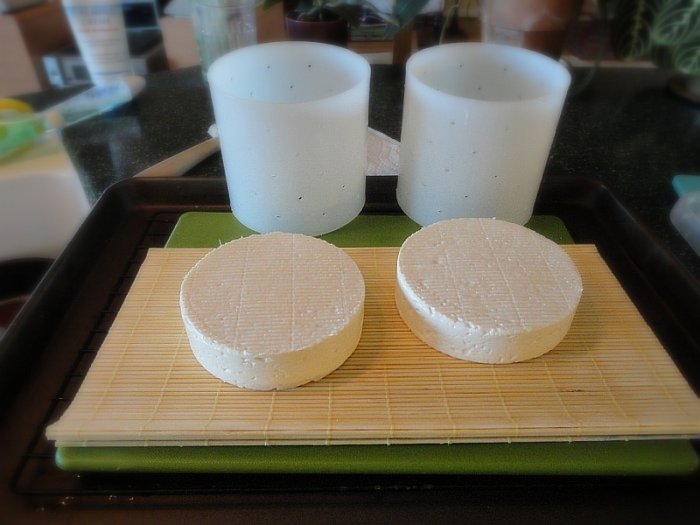
After repeated flipping and an overnight rest, the cheeses are consolidated into their final form. They have picked up a nice pattern from the sushi mats. At this point, they are rubbed with salt to inhibit “bad” mold formation and moved to a draining container.
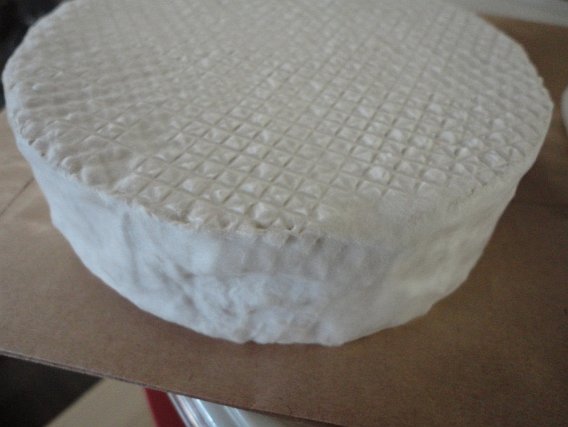
Cheese in final form

Drainage container

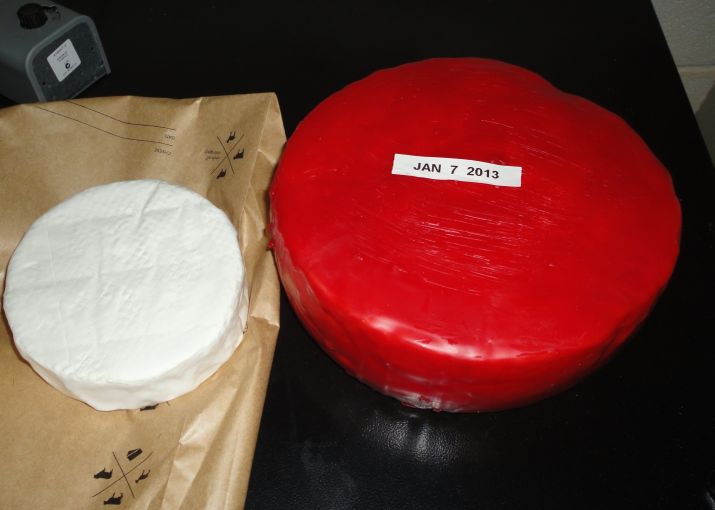
Cheese cave
My cheese “cave” is a refrigerator I modified to maintain 50 degrees. The red cheeses in the photo are Jarlsberg (I hope. I won’t know for a couple of months how they turned out).
The Camembert rounds stay in the draining container for about 2 weeks. After that, they are moved to cheese bags or plastic wrap, still in the “cave”, for about another 2 weeks, until the centers are soft. Then they can be moved to regular refrigeration and the aging process stops. You don’t want to over-age a Camembert, because it will start to break down and get a little stinky. Still safe and edible but not as tasty.
Finally…
Almost finished Camembert covered with fine white mold.
Camembert c’est finis!
Happy cheese making!
Just add water
I’ve often toyed with the idea of a water feature in my garden. Done right, it adds a sense of essential life — a focus on origins, mystery and beauty. Harry Poulter, my colleague in another realm, features water in his garden design and shares his insights in the following article.
Knowing of my interest in water gardening, Michael asked me to contribute something on building a water feature and water gardening in general. – Harry Poulter, Buckingham, VA

It’s mid-March in Virginia and my ponds are just waking up. I love the look and sound of water in the garden, and I love to be able to extend my gardening palette by adding aquatic and semi-aquatic plants.

A few of my pond pals (koi) to the right. I got them very young – FedEx overnight – from a Florida fish farm about 3 years ago. There have already been several generations of babies.
Water, water everywhere
Over the years, I have water gardened in:
- half whisky barrels with liners,
- non-draining planters,
- livestock watering troughs from the Tractor Supply Store (makes a great deck or patio pond),
- preformed liners sunk into the garden bed, and
- a fully excavated koi pond with a custom flexible liner (pictured above).
I’ve grown aquatic and bog and wetland plants, as well as koi and other pond fishes, and hosted local frogs and newts. I’ll cover water gardening options, and show how I created an overflowing pot garden fountain.
Floral Variety
There is a huge array of plants available to the water gardener, and you can add unusual interest to a perennial bed by sinking a water planter in it or adjacent to it.

Many plants which do fine on dry land do even better with their feet in water, such as cardinal flower, canna, and some hibiscus. A visit to a garden center which specializes in aquatic plants can be a real eye-opener.
Starting Simply – barrel liner fits the bill
The simplest water gardening can be done in a waterproof planter on the ground. You can grow a single lotus or a stand of Flags in a large pot.

Sized to fit in a standard half whiskey barrel, they hold about 20 gallons. In a whiskey barrel, they make an attractive deck pond, large enough for a couple of small plants and even a fish or two (depending on your raccoon situation). Or, excavate a hole in the ground, line it with some sand and sink the liner to use as a pre-formed minipond. Leave it as-is for an aquatic planter.
If you want to create a mini-bog garden, drill drain holes a couple of inches from the top, and fill with saturated peat and sand. You can also buy larger, irregularly shaped pre-formed liners to sink in the garden as I did here – this one is about 55 gallons:

Mini-pond in late spring with yellow flags and Ensata iris. Later, pickerel rush and a small water lily will take over. Wild phlox creeps over the edge.
In retrospect, I would not use one of these large pre-formed liners again. Digging is hard enough – trying to fit your dug hole to a pre-formed shape while leaving enough room for a sand liner and not leaving any air voids to weaken the structure is too difficult. Use a flexible liner instead (Pond Making Resources, below).

Pond Making Resources
Flexible liners, cut to shape, are the ultimate in-ground solution. If you decide to go that route, do your homework and buy a good liner, along with a protective underlayment. http://www.bestnest.com/ is an excellent resource for pond liners and general pond supplies.
For any in-ground feature, be sure it is as level as you can get it. It seems obvious but it is easy to misjudge. Don’t rely on your eyes – use a level. You can’t fool water.
For plants and fish, find your local pond supply or pond garden center. There is no substitute for seeing the plants and picking your own. My own favorite is an hour’s drive from me in very rural Virginia: http://www.springdalewatergardens.com/.
For equipment – shop around. Garden centers tend to have a high markup on durable goods, and you will pay a lot more for standard plumbing fixtures, for instance, than you could get elsewhere. Also, you may find that the same item marketed as a “pond” pump will have a higher price than when it is sold as an “aquarium” pump.
In addition to Best Nest, above, I shop at http://www.thatpetplace.com/ and http://www.drsfostersmith.com/ as well as my local Lowe’s.
Making a fountain
You have probably seen the “overflowing pot” type fountain, and you can buy an entire kit ready-made. They are usually filled with pebbles around the base of the pot, and have no open water except in the pot. I preferred to have open water at the base, to be able to add some small plants – and have actually picked up some resident frogs. Here’s how I made my own.
What you need:
- a decorative pot
- a basin larger around than the pot, with a sump,
- a pump and some plumbing
You need power for the pump, and like all outside power, it needs to be from a GFCI-protected outlet.
For a basin, I buried a 20 gallon barrel liner and surrounded it with concrete pavers. We bought a 4-foot tall pot at our favorite rural pond center and had them drill it and add the bulkhead fittings and internal standpipe.

You may be lucky enough to find a pot with a usable bottom hole, or be able to drill it yourself, but I wasn’t confident in my ability to drill a hole in a $300 ceramic pot without cracking it.
The picture shows the sunken barrel liner and broken cinder block used to make a sump under the pot. It is important to get this firmly placed and as level as possible before proceeding.
I added my own pump (an aquarium pump with a small sponge filter) and made a sump by placing the pot on a half cinder block with a side partially knocked out to allow the hose to pass through.

Once assembled, follow these remaining steps to fill, level, and enjoy your fountain!
 Level the pot for the best overflow
 Fountain in action
 Fill the pot and basin with water
I like the bell-type fountain fitting on the top of the standpipe, but there is a disadvantage – the wind will blow some of your water away, and you will have to refill more often. The alternative is to omit the fountain fitting, and just let it overflow. Then, you won’t even need a standpipe on the inside.
Water gardening provides yet another way to synchronize your soul with natural and constructed beauty. Thanks, Harry, for nurturing our garden ideas! – Michael Waddell, Rake & Palette

